
Pokémon Pokéballs Perler Bead Key Chains!

Here's what you'll need...
- Perler Beads Multi Mix Jar (for the Pokémon team Poké Ball rare colors)
- Square Peg Board
- Tweezers
- Wax/Ironing Paper
- House Hold Iron
- Lanyard Hook
- 7mm Jump Ring, or 7mm Split Ring for extra security
- 2 Needle Nose Pliers or 1 Split Ring Plier and still 1 needle nose plier

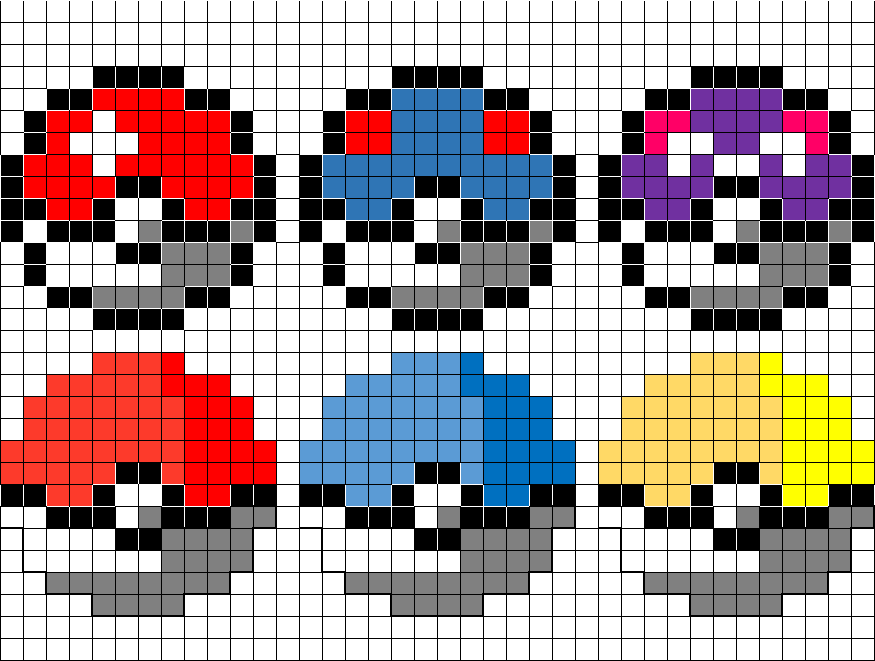
Follow these patterns as shown above. Each block represents one peg on your peg board. The easiest way is to start at the very corner and count. "Row 1, 5 over, black x 4" "Row 2, 3 over, black x 2, red x 4, black x 2" etc...
Be sure not to hit the table!
Here is a listing of each color and the amount you'll need for each.
Poké Ball
Red (x37), Black (x46), White (x17), Grey (x12)
Great Ball
Dark Blue (x38), Magenta (x4) , Black (x46) , White (x12), Grey (x12)
Ultra Ball
Yellow (x20), Black (x66) , White (x12), Grey (x12)
Master Ball
Purple (x28), Magenta (x6), Black (x46), White (x20), Grey (x12)
Team Valor Poké Ball
Red (x20), Hot Coral (x38), Black (x16), White (x15), Grey (x33)
Team Mystic Poké Ball
Dark Blue (x20), Light Blue (x38), Black (x16), White (x15), Grey (x33)
Team Instinct Poké Ball
Cheddar (x20), Yellow (x38), Black (x16), White (x15), Grey (x33)
Ask a responsible adult to fuse your designs! Place your pegboard on a flat, heat-safe surface. Set a household iron to the medium setting. Place ironing paper over the pegboard. In a circular motion, begin to iron the project. When ironed properly, the beads will still have open centers. DO NOT OVER-IRON the beads as it will make the centers of the beads close and can make assembly more challenging. Let the design cool.
Remove the paper and bead design from the pegboard. Flip the design over to expose the non-fused side. Repeat step two. Let cool completely. Once the design is cool, peel off the ironing paper. Your pegboards and ironing paper are reusable.
Note: Beads need heat for about 10-20 seconds per side to fuse evenly. Lift the paper occasionally to see how the beads are fusing. Additional heating time may be required.
Next is the easy part, where you attach your split ring or jump ring. Using your needle nose pliers for the split rings, one in each hand. Split the rings open by pulling one side to you, and the other away. Do not pull them apart directly away from each other, outwards. For the split ring option, use your split ring pliers to save those pretty nails. Open the pliers and place the split ring on the flat side. As you close the pliers down, press the pointed side between the rings of the split ring. Once you have a grip on the split ring, you can slide it around until the end is securely open with room to add your charm, clasp, or whatever else you may be attaching.
Have fun hunting for those Pokémons!
Thank you for crafting with the Krazy Goo!
Nice blog. I really appreciate your quality work. Keep continuing to write more like this.
ReplyDeletesales on top quality needle nose pliers